 Sign In
How to install temporary fencing

2000 Series Temporary Fencing Installation Guide
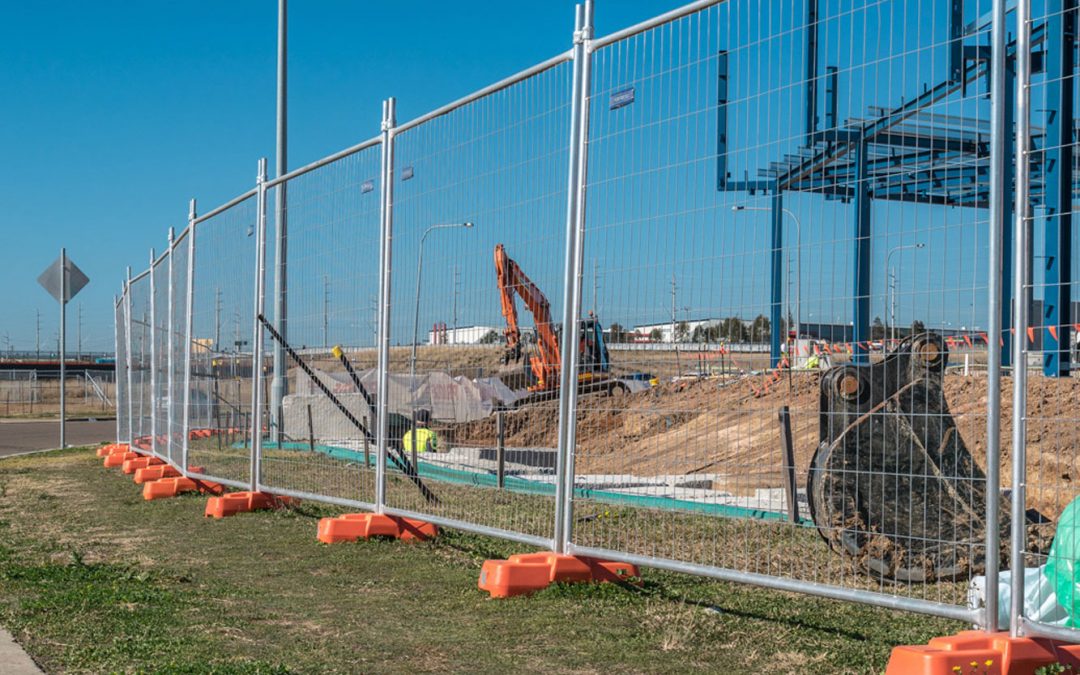
A guide on how to install temporary fencing: from residential renovations and commercial construction to large infrastructure projects, the principles of installing temporary fencing are very similar.
Here are some key do's and don'ts when considering how to install temporary fencing.
Safety alert
Prior to commencing installation of Temporary Fence Panels, a site safety inspection must be undertaken and suitable controls implemented to reduce or eliminate the risk of injury.
1. Identify hazards to yourself & others
2. Assess the likelihood of injury including to the public
3. Find a way to minimise the risk & consult with others
4. Re-check the controls as you go & make changes
5. Complete necessary permits, inductions, assessments & SWMS
6. Ensure all PPE is worn by all team members
7. All relevant site safety rules & legislative requirements must be adhered to at all times
8. Panels fence feet must be installed using safe lifting practices
Do’s & Don’ts
- DO ensure transport vehicle is on solid, even ground before unloading.
- DO maintain distance from suspended loads and mobile plant.
- DO, where possible, work away from the public and mobile or slewing plant.
- DO ensure debris is removed & ground is solid, dry and even to avoid slips or trips.
- DO maintain panel bundles of no more than 30, firmly and evenly strapped before transporting
- DO ensure fence feet are stacked, shrink wrapped and strapped on pallets for transport and storage
- DON’T work under the influence of alcohol, other drugs or fatigue
- DON’T install unbraced panels where there is a risk of fencing moving or falling
- DON’T attached signage or shade-cloth on unbraced panels
- DON’T impede walkways, roadways or otherwise deviate from permits, plans or instructions
- DON’T install where there is risk of falls greater than 2m without height safety equipment
- DON’T use faulty equipment or tools
Components and Specs
Basic:
- Panels (2100mm x 2400mm)
- Fence Feet / Counterweights (150mm H - 230mm L – 25kgs)
- Coupler with bolt & nut
Additional:
- Support brace - 2000 Series Heavy Duty - fence foot/counterweight
- Handrails (2470mm x 400mm)
Basic Installation
- Fence line must be determined by site inspection, instruction and/or permits.
- Fencing is to be installed to a maximum of 3° out of plumb before additional bracing is required (see BRACING)
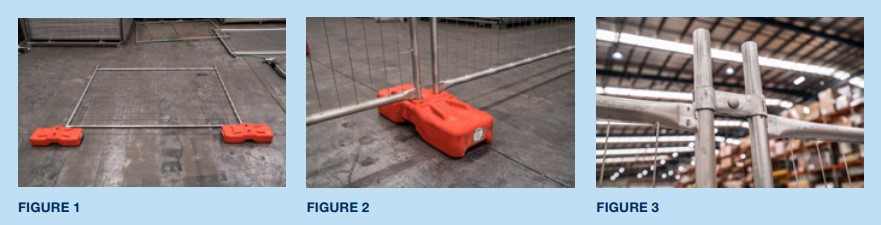
- Lay out panels along a length of the perimeter with fence feet between each panel (See figure 1)
- Fence feet must be 90° to fence panel to guarantee stability – approx. 2.3m apart
- Lift panel into fence feet hole securely – repeat for other end of the panel (See figure 2) assistance is recommended
- Place coupler on two vertical pipes above top rails of the panels joins and secure nut tightly with 16mm socket or spanner (see figure 3)
- Ensure panels or fence feet do not impede walkways or roadways (hand rails must be used if permit allows
- install on or near pedestrian pathways – see HANDRAILS)
- High visibility fence feet should be used in trafficked areas
- Repeat steps 3 – 7 until the install is completed – Perform regular checks of the area to ensure safe install.
Bracing Installation
Bracing must be installed prior to shade cloth, banner mesh or large signs are installed.
It is recommended that clients perform their own wind impact assessment. Long runs of temporary fence should have a standard brace installed every 6 panels.
Bracing installation must conform to Fortress Fencing Systems Test Certificate AS 4687:2007 MT-10/253
NOTE: Fence Bracing must not impact pedestrian walkways or trafficked areas.
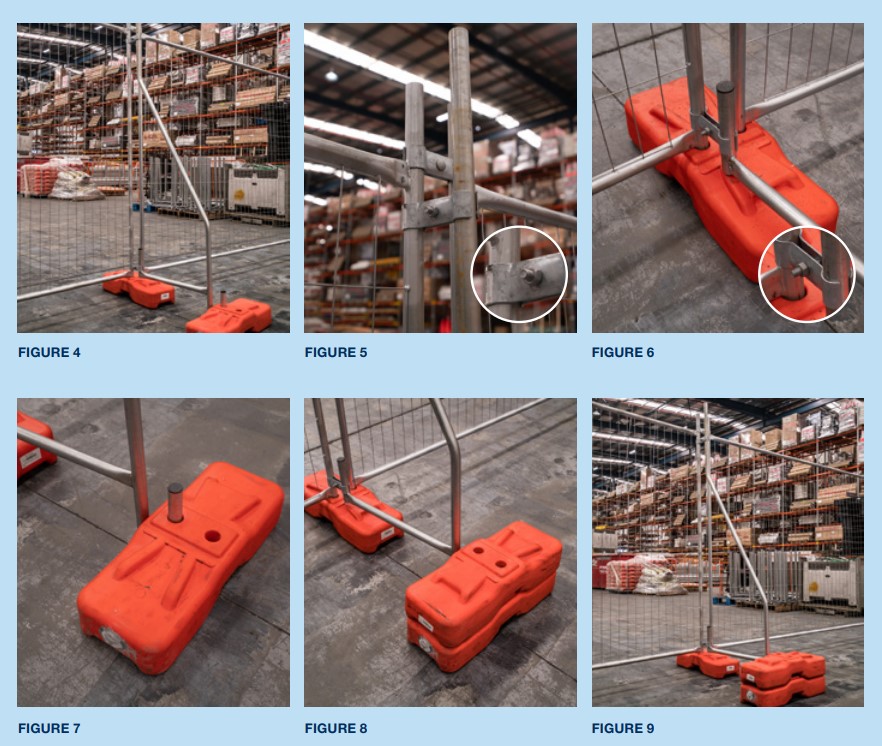
Heavy Duty Brace
1. Ensure brace footing is on firm, solid ground (see figure 4)
2. Attach angled end of brace post to panel vertical post with coupler (see figure 5 & 6)
3. Secure nut tightly with 16mm socket or spanner (see figure 5 & 6)
4. Place fence feet/counterweight securely on bracing pipe (see figure 7, 8 & 9)
5. Continue to brace panels in accordance with Bracing, Counterweights and Wind Load Capacities chart
Shade Cloth, Banner Mesh and Signage
Temporary fencing panels allow for the attaching of shade cloth for screening or dust control and banner mesh for promotional display and safety signage.
Shade cloth and banner mesh may only be installed on braced fencing. Shade cloth and mesh must be secured to the top rail of the fence firmly with cable ties at the recommended 800mm spacing.
It is not recommended to secure the shade cloth/banner mesh at the bottom as this will restrict air flow.
NOTE: The Bracing, Counterweights and Wind Load Capacities chart will be invalidated by the added wind resistance of the shade cloth or mesh. Additional bracing will be required.
Customers who attached shade cloth or signage are advised to seek an independent wind impact assessment by an engineer.
Handrails
Hand rails should be installed where there is a risk of pedestrians tripping over the fence feet, for instance; on or near a public walkway.
Handrails should be installed on all panels that impact pedestrian walkways including on corners of fencing perimeter. High visibility fence feet are recommended in trafficked areas.
- Ensure panel is fully attached and secured
- Assistance with this task is recommended
- Attach vertical pipe of the handrail to vertical pipe of the fence panel with coupler
- Secure nut tightly with 16mm socket or spanner
- Handrail should be no less than 865mm from ground level
- Continue to attach hand rails along panel run until pedestrian impact area has been adequately covered
Find out more
Contact the team at Jaybro and Fortress Fencing for advice on your individual fencing installation. This information is provided as a guide only - always refer to local regulations and safety requirements.

